Sunday, September 19, 2010

Bidvertiser - Pubisher and Advertiser

Bidvertiser is another well-known site such as Google Adsese. Bidvertiser On-Site Bid Per Click offers website owners with the ability to sell their ad space, automatically, to the highest bidder, on a price-per-click basis, where the price is mostly effected by the quality and popularity of their website. Advertisers can place ads directly on sites of their choice and pay only when a visitor clicks-through their site. Bidvertiser serves text ads in all types of standard ad units, including banners, buttons, skyscrapers and inline ads.

What actually need to do to earn money from bidvertiser?
Join the bidvertiser publisher programs and make money online by adding the BidVertiser ads to your site or blog and get paid for clicks.

They pay monthly, either by check, or instantly through PayPal with a minimum of only $10 which compare to Google Adsense the minumum payment is $100.

This is totally free and no any money required just same as google adsense.

Besides, online advertising on websites relevant to your business on a pay per click basis is also available to join yourself to bidvertiser as an advertiser. The pay per click rate is set by yourself.


So, how to join as publisher to start earning? or how to join as advertiser to start promotng your site?


The tutorial please refer to the "How to earn money with Bidvertiser"

How to Join Bidvertiser to earn money

First, click on the below button to start your journey of earning.


Then click on the Join free under PUBLISHERS QUICK LINKS


Fill in the form (Note: you can either get paid through Paypal with minimum $10 or
Check with minimum $50). After fill in the details, Click the "Get Activation Code". After that bidvertiser will send the code to your email account. Once you get the activation code, paste it into the column after the "Copy your activation code from your email and type it here". Finally, tick on below items
- I agree to BidVertiser's Terms of Service
- I will not click on my own BidVertiser ads.
- I will not ask or encourage others to click on my BidVertiser ads.
- I will not place the BidVertiser ads on sites that include pornographic content.


After approved, then login to your account and start your setting.
First go to the MANAGE BIDVERTISERS, then choose the BidVertiser Center, you can see your website/blog on the bottom.

Click on the "Choose Template" to find the change your ads size and colour. Next, go to "Get Ads Code", copy and paste the code into your website or blog.

Now, your website / Blog start earning money for you.

Adsense Knowledge

Niche Sites
Targeted niche sites that have a clear theme, tend to generate more advertising revenue simply because it is easier to achieve decent search engine placement.


Target Keywords
When determining the site's focus, consider how much the advertisers pay for the advertisements. If the site is focused on ringtones, like Ringtone Central , the payout per click is going to be very small. Because ringtones are not high ticket items, advertisers will not spend a lot on pay-per-click advertisements.
With less obvious markets, use Overture to determine how much advertisers pay per keyword. The cost will usually be similar on Google. Search Overture for a keyword then click "View Advertisers' Max Bids" in the top right corner. This will show the Overture inventory and how much is paid per keyword. Because the market has become very competitive, it will be difficult to rank well in search engines with a new Web site that is optimized for the terms that have the highest payout. Consider targeting terms that are moderately priced.


Aged Sites / Time

Over time, as a Web site is spidered by Google, advertisements will generally increase in relevance. In general, older Web sites will rank better in search engines. The closer the advertisements relate to the Web page's content, the higher the "click-through" the publishers will see.


Coding
In order to minimize a Web site's maintenance, place the Google generated AdSense code in the Web site template or an "include" file. This will allow you to easily experiment with different advertisement sizes and ad placement, and keep the Web maintenance to a minimum.


Tracking Channels
In order to know how effective a specific Web site or ad placement is, use distinct channels and subchannels within Google. This will allow you to discern what performs best on a specific Web site. Using channels will tell you what sites are making money, what advertisements are making money and what ad position is the most profitable on a specific Web site. Keep in mind that you should run an advertisement for a full week, in order to properly test its effectiveness, different days of the week will vary the Web traffic so comparing one week to another will give the most accurate reflection of how effective a campaign performs.
When testing different advertisement sizes, placement or color schemes, be sure to leave campaigns in place for one week. Different days will often result in Web traffic fluctuations. Comparing Web traffic week to week will give a clear indication of what ad formats perform the best.


Integrated Ad Placement
Many webmasters have been successful at integrating advertisements into a Web site. The easiest way to integrate an advertisement into a Web site is to remove the advertisement border. This will allow the ads to better blend with the Web page. Google recommends contrasting the link colors with the Web site colors to increase click-throughs. It is also suggested that webmasters randomize the color of the advertisements, so that frequent users will not naturally "filter" the ads.


Number vs Value of Advertisements
Up to three advertisements can be listed on each page.
This decreases the value of the advertisements served, so publishers should cautiously add advertisement units, as it dilutes ad inventory. In other words you want to serve the most expensive ads at all times.


Hot Spots
Like Web copy, "above the fold" holds true with AdSense as well. This means that advertisements that appear without having to scroll will be read more frequently. Hot Spots are areas on a Web page that result in a higher percentage of click-throughs. According to Google, the highest paying advertisements are located on the hot spots.
Google does not indicate if image advertisements or text ads perform better, so webmasters are encouraged to experiment with both.


Highest performing Ad Sizes
According to Google the 336 x 280 rectangle, the 300 x250 rectangle and the 160 x 600 sky scraper result in the highest number of click-throughs. Depending on the website's design and layout, publishers may experience different results with different ad sizes, placements and color schemes. Expirement and track the results for each website to maximize the AdSense payout.

Social Media Optimization (SMO) - Submit your Article

Why need Social Media Optimization (SMO)?
Social Media is another method to bring traffic to your website
besides the Search Engine. In order to optimize your Social Media, article submission is the fastest and easiest way.

Why can find the article submission site?
Below is the Article Submission List. Please remember, you need to write a unique article for article submission.
http://www.ezinearticles.com/
http://www.goarticles.com/
http://www.articledashboard.com/
http://searchwarp.com/
http://www.isnare.com
http://www.selfgrowth.com/
http://www.articlegeek.com/
http://www.articlecity.com/
http://www.easyarticles.com/
http://www.articlebiz.com/
http://www.articleworld.net/
http://www.articlesbase.com/
http://www.articlesnatch.com/l
http://www.web-articles.info/
http://www.articleset.com/
http://www.talkinmince.com/
http://www.content4reprint.com/
http://www.content.onlypunjab.com/
http://www.articlecache.com/
http://www.amazines.com/
http://www.allgoodarticles.com/
http://www.articlesalley.com/
http://www.1888articles.com/
http://www.articledepot.co.uk/
http://members.article99.com/
http://www.free-articles-zone.com/
http://www.womenrussia.com/
http://www.article-treasure.com/
http://www.articlenetworks.com/
http://www.articlecircle.com/
http://www.submityourarticlesnow.com
http://www.articlesworldonline.com/
http://www.articlecirculation.com/
http://actuafreearticles.com/
http://www.articlemark.org/
http://www.articleblotter.com
http://www.1articleworld.com/
http://www.2articles.com/
http://www.a1-articledirectory.com/
http://www.freearticlesandcontent.com/
http://www.freecontentarticles.com/
http://ireprint.info/
http://www.semanticbay.com/
http://www.thewebbpage.com/
http://www.365articles.com/
http://www.articlebasement.com/
http://www.rightarticle.com/
http://www.4rum.info/
http://www.articler.com/
http://www.articleon.com/
http://www.articleshouse.com/
http://infopool.webverve.com/
http://www.articlenic.com/
http://www.articlestar.info/
http://www.readezarchive.com/
http://articles.jaaky.info/
http://www.travellaughenjoy.com/
http://www.article-friend.com/
http://www.articlegallery.net/
http://www.article-book.com/
http://www.tinyarticles.com/
http://www.huntarticles.com/
http://www.articletogo.info/
http://www.collectibles-articles.com/
http://www.articlemajoris.com/
http://www.0001articleworld.com/
http://www.1starticlesdirectory.com/
http://www.2karticles.com/
http://www.article4submit.com/
http://www.aokarticles.com/
http://www.a1-article.com/
http://articles.acemmedia.com/
http://www.ad-matrix.net/
http://www.alivearticle.com/
http://www.allentrepreneurinfo.com/
http://allholisticwellness.com/
http://www.allsiteshere.com/
http://www.alltopinfo.com/
http://www.alleyarticles.com/
http://www.anyarticle.net/
http://www.articlearcade.com
http://www.articlearmies.com/
http://www.articleavenue.com
http://www.articlebar.com/
http://www.articlebase.info/
http://www.articlebeach.com/
http://www.articlebin.com/
http://www.article-buzz.com/
http://www.articlerag.com/
http://www.article-republic.com/
http://www.articleresourceindex.com/
http://www.articlerich.com/
http://www.articlesauce.com/
http://articlesniper.com/
http://www.articlestreet.com/
http://www.articletrader.com/
http://www.gertbruhn.com/
http://www.articleway.com
http://www.articlewisdom.com/
http://www.ezarticleworld.com/
http://www.articleyard.com/
http://www.article-free.net/
http://www.article-syndication.info/
http://www.article-zine.com/l
http://article.33dir.de/
http://www.article4.us/
http://www.articledepot.net/
http://www.articleaddict.com/
http://www.articleated.com/
http://www.articlecat.com
http://www.articlegold.com/
http://articles.kaboozie.com
http://www.articlelists.com/
http://www.bestarticlesdirectory.com/
http://www.bigarticle.com/
http://www.bigfreearticles.com/
http://www.blogticles.com/
http://www.businessarticledepot.com/
http://www.businesses-franklin.com/
http://www.bylamoarticles.com/
http://www.aardvarkarticles.net/
http://www.activeauthors.com/
http://www.bylamoarticles.com/
http://www.workoninternet.com
http://www.digitalezines.com/
http://www.fish4articles.com/i
http://www.deeparticles.com/
http://www.site-reference.com/
http://www.lbry.com/
http://www.articlewebdirectory.net/
http://www.cajun101.com/
http://againtscancer.com/
http://www.surveillanceequipment.biz/
http://authorpalace.com/
http://www.damima.com/
http://www.faqall.net/
http://www.ezine-submission.com/
http://www.ezine-writer.com.au/
http://ezine4you.com/
http://www.ezinesarticle.com/
http://www.freeblogarticles.com/
http://www.free-content-resource.com/
http://www.businesscurrents.net/
http://www.ganazat.com/
http://www.gestbiz.com/
http://getmyarticles.com/
http://www.gettyarticles.com/
http://www.godiggs.com/
http://www.goodinfohome.com/
http://www.halazona.com/
http://www.haveinfo.net/
http://www.healthguidance.org/
http://www.how-to-articles.com/
http://www.httparticles.com/
http://www.holidaydigg.com/
http://www.honestinformation.com
http://www.iguides.org
http://infoaboutweightloss.com/
http://www.indexspeedy.com/
http://www.infopool.webverve.com/
http://www.infobious.com/
http://www.infomartarticles.com/
http://www.infonexus.org/
http://www.informationbooth.net/
http://www.informationpagesonline.com/
http://www.internetarticledirectory.com/
http://www.isysi.com
http://www.articolando.com/
http://articles.fjewelrystore.com/
http://www.kokkada.com/
http://www.kumartiwari.com/
http://www.labusinessjournal.org/
http://www.lifeweightloss.com/
http://www.legalinfoarticles.com/
http://www.linkmyarticles.com/
http://www.links4love.com/
http://www.livearticledirectory.com/
http://www.loanarticles.co.uk/
http://www.local-list.us/
http://www.look-4it.com
http://www.marketingarticlelibrary.com/
http://www.momarticles.com/
http://www.myaddirectory.com/
http://www.neweducationaltoys.com/
http://newfreedirectory.com.ar/
http://www.nextarticles.com/
http://www.mampang.com/
http://okayarticle.com/
http://www.onlinearticlesearch.com/
http://www.replaceyoursalary.com/
http://www.oocuz.com/
http://www.organizingweb.net
http://www.our-articles.com/
http://www.pagequest.co.uk/
http://www.perfectarticles.com/
http://www.petarticledirectory.com/
http://www.philosopherspeak.com/
http://www.petsgator.com/
http://www.pieceabout.com/
http://articles.poetrykafe.com/
http://www.point-articles.com/
http://www.postondashboard.com/
http://www.savearticles.com/
http://relevantarticles.com/
http://www.scoopquest.com/
http://www.searcharticles.net/
http://searchwarp.com/
http://www.selectivearticles.com/
http://www.selfseo.com/
http://articles.seobusinessdirectory.com/
http://articles.seostudio.com.au/
http://www.shikapika.com
http://skaffearticles.com/
http://www.smallbizarticles.com/
http://www.smarticles.org/
http://www.smasharticles.com/
http://www.stvq.com/
http://www.raz-sports.com/
http://www.sportsmansarticleresource.com/
http://www.stakoza.com/
http://www.stupidarticles.com/
http://www.informationbible.com/
http://www.212articles.com
http://www.submitondashboard.com/
http://www.superpublisher.com/
http://www.terrysarticles.com/
http://www.thearticlenet.com/
http://www.thecontentcorner.com/
http://www.tihson.com/
http://www.timestreets.com/
http://www.tiwarinews.com/
http://www.tntarticles.com/
http://www.top5tv.com/
http://www.toprankarticles.com/
http://www.trafficvillage.com/
http://travellingtoday.com/
http://www.guiding-stars.com/
http://www.ultimatearticledirectory.com/
http://www.valuablecontent.com
http://www.vipdigg.com/
http://www.webcitymarketing.com/
http://bestwebdirectorysubmission.com/
http://www.webdesignarticles.net/
http://www.articles.webmasterforumuk.co.uk/
http://www.wlinker.com/
http://www.webmasterinfoandcontent.com/
http://www.wmarticles.com/
http://wah-articles.work-from-home-directory.com/
http://www.workoninternet.com/
http://www.worldtech.cc/
http://www.wowarticles.com/
http://www.wuph.com/
http://www.exactrelease.com/
http://www.itempad.com/
http://www.articleinsert.com/
http://www.philvault.com/
http://www.ppnow.com/
http://www.thearticlesource.net/
http://www.articlesnew.com/
http://www.articlesrightnow.com/
http://www.articlessense.com/
http://articles.itpimp.net/
http://articles.itpimp.co.za/
http://www.articless.net/
http://articlestars.com/
http://www.articletarget.com/
http://www.articletrader.com
http://www.articlewarehouse.net/
http://www.articleweb.us/
http://articlezones.com/
http://www.articopia.com/
http://artictory.com/
http://www.associatedarticles.com/
http://www.australianarticle.com/
http://www.linux.com
http://www.webpronews.com/
http://www.webknowhow.net/
http://www.thewhir.com/
http://www.articleclick.com/
http://www.qarchive.org/
http://www.devpointer.net/
http://www.bharatbhasha.com/
http://www.expertarticles.com
http://www.businesshighlight.org/
http://www.articleson.com/
http://seoarticles4u.com/
http://www.the-article-directory.com/

Finally, all the best and wish this can help you on your SMO

How to create a sitemap

A sitemap of a website is similar to the table of contents of a book. Sitemaps are important because it guides web surfers to the particular part of the website they have a point of interest in. With it they would save time following links and get right to the point instead.

Sitemaps are also where search engines look at if somebody is looking for a particular keyword or phrase. If you have a site map, you can most likely be searched.

Creating a sitemap, now with software technology surging in, is relatively easier than before. You need not be a programming guru to be one. All need is a notepad, a program editor, and some patience. Here’s how you do it:

Create the listing on a notepad.
It doesn’t necessarily have to be a notepad. Any word processing program will do. First off, make sure to type in all the parts and pieces of your website. Include all pages and all links you have. Create it as if you listing the contents of your book. Make a draft first. You’re sure no to miss something out this way.

Create a new page for your sitemap.
You can insert the sitemap on your website on one of its pages or you can create an entirely different page for it. Using your notepad, incorporate all tags necessary to it to make another webpage. Open up your website creator program and tag your sitemap using it. If you have created your website on your own, this will be easy for you.

Create a link for the sitemap.
You won’t be able to view the sitemap if you won’t put a link for it, of course. Create the link on the front page of your website so that visitors can view it right away and be directed appropriately.

Check your work.
It is important to validate the functionality of the links you created on the sitemap. Test each and every one in there and if you get an error, be sure to fix it accurately. Run through every single page to make sure that all are accounted for.

Upload your work.
Place the sitemap now on your live browser and double check it. It should function as smoothly as the dry run. Error should be minimal at this stage since you already have verified it locally.

The steps provided herewith is the manual way of creating a sitemap. These days, if you search hard enough on the web, you will find online programs that will do all these work for you. All you have to do it type in the URL or the link of your website and they will create the sitemap with click of a button.

Of course that method is generic. All of you who have created their sitemap that way will have an end product that is all the same, plus there’s that possibility that something else will be inserted in there too. Then again, the process is less taxing and way, way simpler.

But if you want a more personalized output, and you are pretty good with computers and programming yourself, better make one of your own. And since you made your website anyway, creating sitemap is just like creating any other page on the website. Other than you’ll know for sure the links are accurate, you can organize the links the way you prefer it to be. Major parts of the site are emphasized compared to less significant. This is important especially if you are selling products or offering services online.

Sitemap is vital to a website. People search the web a lot for something. If your website has what that particular person is looking for, and your sitemap reports it, then you have a new customer looking at your items. Not only that, they will see some other things up for sale that they might be interested in as well.

Sitemaps, be it generated by a program automatically or you made it yourself, presents the same purpose. That is to lead your visitors to where they’re likely headed, and for you to be seen on the World Wide Web through search spiders. So with these, make sure your website has a sitemap of its own, lest make one.

How to Set Up Adsense Adds?

Once you have been approved as an adsense publisher, you need to set up your ads.
You can found there are 3 types of ads you can choose. So, how is the different and how you going to earn from it?

1.AdSense for content
Automatically crawls the content of your pages and delivers ads (you can choose both text or image ads) that are relevant to your audience and your site content—ads so well-matched, in fact, that your readers will actually find them useful.
You will get paid when someone click on the ads display by google.

2.AdSense for search
Allows website publishers to provide Google web and site search to their visitors, and to earn money by displaying Google ads on the search results pages.\
You will only get paid when the visitor using your google search engine and they do click on the google ads which display on the page after searching.

3. Adsense for Referrals
You can choose the product you want. Please take noted that you must careful during make a referrals ads. Aim on country and language your website/blog focus on, this is the way to provide you the best money.
You will not get paid even the visitor click on your referrals buttons. You only will get paid when the right visitor lead/buy the product/website, you need to get the details of the product before you set it as your referrals.

Finally, maybe you will ask what to choose and which is better?
Sorry to said that it is depend. However, there are some tips for you to refer to.

We do it step to step. More information and Tips are coming soon.

Free method to generate your traffic

Putting up a aggregation would of advance crave a lot of things, to get beeline to the point, you charge a capital. To accomplish money requires money as well. But of course, with the versatility the internet offers, there are abounding means you could acquisition that could advice optimize the abeyant of your armpit or business in breeding traffic.

While there are means to jumpstart your cartage flows, abounding sites do not accept the assets that others accept to accomplish added cartage for your site. Well, you do not accept to absorb a cent; all you charge is the able mindset and a lot of eagerness. You additionally charge accept the drive and backbone to do adamantine assignment and analysis to accomplish added cartage for your site.

How candied it is to accept added cartage for your armpit after spending a distinct cent. Now it is a abiding affair that abounding sites accept accessories that action tips and guidelines in how to accomplish cartage application alone chargeless methods. Because it is possible, you do not charge to acceleration a distinct cent, it may booty time, to say honestly, I am not activity to exhausted about the backcountry with you. You get added acceptable affairs by advantageous for your advertisements, but at atomic you get a angry adventitious with some of these chargeless methods I am about to acquaint you.

Take advantage of online forums and online communities. The abundant affair about forums and online communities is that you can ambition a assertive accumulation that fits the assertive demographic that you are attractive for. You can altercate about lots of things about the alcove that you represent or offer. Addition abundant advantage is that you apperceive what you are accepting into and you will be prepared.

With online communities and forums you can body a acceptability for your company. Show them what you are fabricated of and wow them with your ambit of ability about the subject, with that you can body a acceptability and body assurance with the bodies in your ability and knowledge.

You can additionally accomplish use of newsletters. Accommodate bodies with a archive of your accessories and absorbing and absorbing articles. If you accomplish it absolutely absorbing and entertaining, added bodies will assurance up for your newsletter and acclaim it to added people. The added bodies who signs up for your newsletter, the added bodies there will be that will go to your armpit accretion your traffic.

Another abundant abstraction is trading links with added sites. You do not accept to absorb a cent. All you accept to do is ability an acceding with addition webmaster. With exchanging links, the efforts both sites do will account both sites. Every cartage that goes to the armpit could potentially bang on the articulation of your armpit and appointment your armpit as well. This works able-bodied abnormally back both sites affection the aforementioned niche.

Write accessories that could annoyance the absorption of bodies that accept absorption in your product. Try autograph accessories that will accommodate tips and guides to added aficionados. Autograph accessories that accommodate acceptable account and ability to added bodies would accommodate the all-important breadth your cartage breeze needs.

Many sites action chargeless acquiescence and announcement of your articles. Back bodies acquisition absorption in your accessories they accept a acceptable adventitious of afterward the clue by award out area the commodity originated. Include a articulation or a abrupt description of your aggregation with the commodity and there is abundant anticipation that they will go to your site.

Write acceptable agreeable for your site. Abounding chase engines clue bottomward the keywords and keyword phrases your armpit uses and how they are used. It is not a claim that a agreeable should be done by a able agreeable writer. You could do your on but you accept to accomplish agreeable for your armpit that is absorbing as able-bodied as informational. It should accommodate assertive requirements as able-bodied as abundant quality.

Generally, internet users use chase engines to acquisition what they are attractive for. Chase engines in acknowledgment use keyword analytic in acceptable their chase results. With the appropriate keywords, you could get aerial rankings in chase agent after-effects after the costs.

All of these methods and added will drive added cartage to your armpit for free. All it takes is a bit of accomplishment and continued man hours. Learn all you can about the methods depicted actuality and you will anon accept a armpit with a abundant cartage breeze after the accepted costs that appear with it.

Small tips on making money from your blog

By placing banners on your website, you can increase the monthly revenue greatly. This option is better than a partner for various companies, because then you get a monthly amount regardless of how many of your visitors to the website or make a purchase. The most important thing is that you have to create an informative website filled with useful items, so you can generate a high amount of returning visitors. If your site rises on search engine rankings, the empty space on your site will begin to look more and more appeal to advertisers. Anyone can be a partner, but a banner on the right spot on a high-ranking website will in most revenue for a company. Once you have established yourself as a site useful for them, you can rent various places on your site for advertisers to place banner ads. Every month you will be paid for the same fee, regardless of how much they may or may not make you.

Earn money with blog blogging

There are several forms of advertising that can be used to earn money from your website. If your site has many visitors, it can be very worthwhile discreetly using integrated advertising of "revenue" of your website content.

There are 3 levels of advertising: Pay-per-impression (CPM), pay-per-click (CPC) and pay-per-action (CPA, CPL, CPS).

Pay-per-impression you pay a certain amount for every 1000 times an ad is displayed for visitors to the site. The payout is low, but you can be sure a certain level of return - based on the number of visits your site receives each month. Also known as CPM (cost per 1000)

Pay-per-click, you pay a certain amount each time someone clicks an ad on your site. The payout is higher than pay-per-impression, but you do not know exactly how many visitors actually click on the ads. The more relevant ads to the page content, the greater the chance that the visitor is to click on an ad.

Also known as CPC (Cost per click) Pay-per-action has the highest payout, but you only get paid if the visitor you refer goes on to perform a number of predefined measures such as placing a order on the site. Unless the ads you server are very closely related to the topic of your website, the chances of this happening are quite slim, so you should have a very high level of traffic (visitors) to this worthwhile. Also known as CPA (Cost per Action), which in turn can be divided into CPL (Cost per lead) and CPS (Cost per sale).

On balance, pay-per-click is probably the easiest way to start earning money from your website quickly. You will not be rich, but everything helps!
A very quick and easy way to earn money through relevant ads, it is enormously popular Google AdWords program. You only need to sign up for an AdSense account, gives you some basic information about your site and Google some code for you. Place the code on your site to start earning money every time someone clicks on the ads.

The good thing about AdWords is that the ads are shown, are automatically selected to be relevant to the content of the page that appears. This makes the ads much more appeal to your site visitors. The disadvantage is that the payout is not so high - usually only one to a few U.S. cents per click.

Another alternative is the use of an advertising agency. The principle is similar to AdWords, but you choose specific ads from a range of you, instead the ads are automatically generated depending on the content of the page. The payout per click is generally higher than those of Google, but the range of advertising and its importance is more limited, so your CTR (click through rate - ratio of clicks to visitors) would lower can fall out.

If you think individual affiliate programs with a high degree of relevance to your site, this could lead to an impressive stream of income. For example, if visitors to your site are interested in Joomla, you could try a system like the Rocket Theme template club, or Magazine.

Opportunity for blogger and webmaster to earn money

Link worth is one of the website that provide opportunity for the blogger and webmaster to earn money. Total 11 types of service is available for both the advertiser and publisher.

1. LinkAds
Selling advertising space on your website allows you to generate additional revenue, but no one wants to annoy their visitors with obnoxious graphical ads that might send them clicking out and moving on. Ever surfed onto a site and had one of those animated graphics slide down over the content? You can’t click it off the screen fast enough! LinkAds are a perfect way to host advertisements on your page without hassling your visitors and losing their respect.

LinkAds are text-based advertisements linked directly to an advertiser’s target landing page and hosted in a specific area of your homepage, sub-page or entire website. You control your earning potential by determining how many ads you want to host, which pages you want to host them on, and let LinkWorth do the rest.As a LinkAds partner site, you’ll enjoy some of the highest payouts in the market.


2. LinkWords
When hosting advertisements on your site, there are several factors to consider. One, of course, is your earning potential. If you’re going to host advertising, you want to make the most money possible!Another factor, though, is your visitor. You want your advertisements to be unobtrusive and relevant for them. LinkWorth’s LinkWords meet all the requirements.

LinkWords are pay-per-click ads, which means you earn a percentage of the revenue every time someone clicks the advertisement.LinkWords advertisements look much like a hyperlink, as they are embedded directly into an advertiser’s preferred keyword strings. When a visitor to your website mouses over the hyperlink, an in-line advertising window is launched to display information about the advertiser’s product or service. For partners who want to avoid obnoxious and unwanted advertising, LinkWords is the perfect solution.

3. LinkPost
Blogging has become a primary means of communication on the web today with legions of dedicated readers consuming every syllable that their favorite bloggers publish. So, as an Advertiser, why not capitalize on this fact and have them say a few nice words on your behalf? Our point exactly!

A LinkPost is a paid blog post written by a blogger within the LinkWorth community. Unlike other similar services, LinkWorth allows its' Advertisers to have some control about what's being written. Why pay for someone to bash you, right? Allowing a few requirements puts you in the driver's seat. Specify exactly what it is you want reviewed, mandate that it's a positive review, or let the chips fall where the may and allow the blogger free reign. With LinkPost, it's entirely up to you.

Not only is LinkPost an excellent way to generate buzz about your company's products and services, but it's also a phenomenal way to build links organically. Each LinkPost contains a minimum of one link back to you embedded in the content, using the anchor text of your specification.


4. LinkInTxt
You want to offer quality advertising space to your advertisers, but you don’t want that space to be obtrusive to your visitors. Advertisers want to be able to get as much value as possible out of the advertising they place on your site, and offering them that opportunity will make them much more likely to stick with you. At the same time, you don’t want their advertising to take up too much of your space or bombard your visitors with annoying graphics.

LinkInTxt is the newest innovation from LinkWorth that combines link relevancy, page popularity and direct traffic into one ad unit. It’s one of the best ways to keep your advertisers happy and keep their intrusion on your site space to a minimum. With LinkInTxt, direct links to your advertiser’s target pages are embedded within the existing content of your page using their preferred keywords. As a result, the advertiser acquires a highly relevant backlink, helping to boost their page relevancy and popularity, while also offering them the benefit of direct traffic from visitors to your site who click the hyperlinked advertisement. It’s that simple.

5. LinkBB
The more traffic you have coming to your site, the better. Advertising isn’t usually a way to gain more traffic, but that’s all changed with LinkBB. As a LinkBB partner, you can host advertising on your site that won’t just increase your revenue—it will bring more visitors to your site as well. LinkBB is a win-win for both advertisers and partners, and, as a partner, you’ll get some advertising benefit from offering LinkBBs to our advertisers.

LinkBBs are internet billboards. An advertiser writes a page of content with links to their products and services. Once you approve the content, the content page is hosted as a page on your website, complete with your template.

In effect, you are expanding your website content, while also generating advertising revenue for hosting sponsored content advertisement. Because LinkBB content pages are articles, often developed by LinkWorth content writers, you can rest assured that they contain quality information that is designed to actually show up in search engine results pages for specific keyword strings. With LinkBB you’re not only helping to build highly relevant backlinks for the advertiser who placed the advertisement, you’re also gaining higher visibility in the search engines for your own website by feeding the search engine crawlers with more information.


6.LinkMura

The more advertisers who take an interest in your site, the greater your chances of increasing your advertising revenue—it’s just that simple. As a partner with LinkWorth, you want our advertisers to be chomping at the bit to get on your site. When they do, they’ll spend their money—with you.That’s why you’re here.

LinkMura, or Mulit-URL Rotating Ad, is a more advanced version of our LinkAds and LinkSura products, and it helps get those advertisers excited to advertise with you. This text link advertising mechanism is unique to LinkWorth in that it is the only text link advertisement that can rotate the anchor text as well as the target landing page, highly benefiting your advertisers. With LinkMura, an advertiser can target multiple keywords and pages on their website while paying for a single text link ad. The advertisements change on every page view or search engine crawl, helping to build popularity and backlinks for many different pages on an advertiser’s website.

Offering LinkMura opens the door for all types of interested advertisers, as they can help build popularity and relevancy for multiple pages through a single text ad, leading to increased advertising revenue and making you a cherished partner.


7. LinkSura
As a partner, your main concern is making the most out of the advertising space you offer. You want your advertisers to be happy with the results they’re getting from your page because they’ll be more likely to stay with you and spend more money. You want to offer them an effective way to advertise because you want their advertising dollar.

LinkSura offers you more room to grow as a partner with LinkWorth. Much like a single LinkAd, Single URL Rotating Ads (SURA) are unobtrusive textual ads located on your homepage, specific sub-page or entire website. Unlike a single LinkAd, LinkSURA ads rotate the anchor text with each page view or visit by search engine crawler, allowing your advertiser the ability to promote multiple anchor text keyword strings for a single landing page. By integrating LinkSURA into your partner pages, you can add additional value and advertising options, leading to an increase in advertisers and revenue.

8. LinkArt
Search engine optimization revolves around a variety of factors, two of which being keywords and page popularity driven by backlinks. LinkArt allows you to make the most of both, focusing on using relevant keywords within an article to gain search engine relevancy for your website while hosting these articles on third party websites to boost popularity for your target pages. LinkWorth strives to build the most effective search engine optimization campaigns possible, and LinkArt is an integral part of that process.

LinkWorth also offers you well-crafted LinkArts through our in-house writing team. Our highly trained writers have years of experience in writing effectively optimized articles, and they can create LinkArt material that will make the most out of your article submissions. LinkArt articles developed by our professional copywriters are optimized for your preferred keyword strings with a focus on keyword density and search engine-friendliness. The final result: a well written, highly targeted article that both feeds the search engines and provides human readers with quality information about your industry, product or service. Let our writers provide you with their services so that you get the best LinkArts possible.

9. LinkPack
If you have multiple websites, keeping up with your advertisers can keep you too busy to do anything else—and you’ve got a lot to do! LinkPack allows you to bundle multiple websites and offer them as one package deal to make managing your partnership with LinkWorth easier, more cost-effective, and hassle-free. By the same token, you want to attract as many advertisers as possible—and advertisers are typically cost conscious.By offering a suite of domains at a discounted rate, you’re sure to attract the advertisers you’re looking for while making the process as simple as possible.

LinkPack allows you to offer package deals to your advertisers so they can publish a single LinkAd to all of your sites. If you have several domains in the same industry, you can group them together for advertisers, providing them with a multitude of on-topic backlinks. You can also offer a different discounted price to attract bargain hunters, and LinkWorth will facilitate all of those transactions so that generating revenue from advertising becomes a no-hassle prospect.


10. LinkPress
Press releases are one of the most powerful ways to bring attention to your site. They spread the word about your products and services, announce what’s new at your company, and put your name on the lips of both industry insiders and your prospective customers. Press releases can be a costly prospect when you hire a PR company to do the work for you. LinkWorth makes the power of press releases available for any business, from the smallest start-up to the biggest corporation.

Your LinkPress will be distributed to as many as 60,000 news-related websites including the big names like Reuters, CNN, and MSNBC. They are also picked up within 24 hours by powerhouse search engines like Yahoo and Google. Press releases are the absolute best way to get people talking about your site, products and services. Want to sell your company? LinkPress can flood the market with your brand name and, before you know it, there could be venture capitalists fighting for your business.

If you’re a business owner and have never written a press release, let LinkWorth content copywriters develop your press release for you. Our writers can target your press release for both search engines and human readers to maximize your results. Our professionals will speak with you to find out your specific goals and craft the perfect press release for the biggest impact. We’ll write your press release so that potential customers or interested parties find value in your products and, at the same time, target your specific industry keywords so that your press release actually shows up in search results for your industry.

11. LinkDir
As an advertiser on the internet, what’s your ultimate goal? More traffic to your site. Once they’re at your site, you have the opportunity to convert a visitor into a buyer—but you’ve got to get them there first. There are a variety of necessary techniques that should be applied to any search engine optimization strategy, and LinkDir is one of them. Submitting your website to popular directories such as DMOZ, Jayde, Stopdog and Searchsight, to name a few, is an essential step to any online marketing and link building campaign because it builds category and keyword relevancy for your website, while at the same time increasing your website’s popularity—not to mention, these directories get a lot of traffic and generate clicks.

LinkWorth’s directory submission service, or LinkDir for short, is an easy way to gain your customer’s attention and drive traffic—prospective buyers—to your site. For a one-time submission fee, LinkWorth manually submits your website to hundreds of trusted directories. If you want to be seen as an authority within your market, LinkDir can help. More than that, LinkDir can save you time. Letting LinkWorth’s team take on the time-consuming task of directory submission means you get to enjoy the fruits of submission without having to perform the tedious task yourself.

List of paid to blog - Optimize earning from blogging

Wondering where you can get paid to blog? Or how to earn money from blogging?
Here sharing some trustworthful paid to blog website as a reference and wish you enjoy your earning while blogging.

PayPerPost - Get paid as much as $ 500 or more per month writing articles and reviews of their sponsors on your blog.

Review Me - After your blog is accepted in their network, they pay you $ 20 to $ 200 per message that you write.

Smorty - Earn $ 6 to $ 100 dollars per item, you write in your blog. Amount paid for each item depends on the overall popularity and PageRank of your blog.

SponsoredReviews - Write reviews for their advertisers products and services on your own blog. They bring a 35% service charge for their services.

BloggerWave - Select the advertiser opportunities that best suit your blog and write reviews about their products and services.

BlogToProfit - Make $ 250 dollars or more by writing new messages on your blog.

Linkworth - Make up to $ 500 by review other website / blog on your blog. You can choose the partnership with both 30/70 split or 50/50 split.

What the google barcode means?


Today is the google launch the Google Bar Code Doodle to celebrates bar code invention. Many people wondering what is the google barcode mean, and most of the people are thinking that the barcode means "google". The actual reading for the barcode is "googlle".

Yes, it means "googlle". Dont suspect that google making a big mistake on using the barcode, it not only celebrate the bar code invention but also google 11th anniversary. That's the actually google put the barcode as "googlle" but not "google".

Wednesday, September 15, 2010

Blogger Navbar – How to Remove It

First off, what is the Blogger Navbar?
The Blogger Navbar appears by default at the top of every Blogger-powered blog. It is available in several colors, and is configured in the Template tab in Blogger’s interface. If you are using a classic template, you’ll see a menu from which you can select a color. For blogs using Layouts, just click the “edit” link on the Navbar page element. Blogger gives a more detailed explanation of this here.
There are several reasons why I think it’s important to remove the Blogger nav bar but I’ll name my two most important reasons. First one being that it’s an eye sore and makes your blog look less professional. Secondly, when you click on the “next blog” button you never know what type of blog you might stumble upon. There are so many spam blogs with adult content or other information you don’t want young people to read. When you do block the navbar on your own blog, you prevent others from also easily leaving your site and accidentally heading to one of these spam sites.
blogger navbar
Unfortunately Blogger doesn’t give you the option to remove the navbar easily but this simple modification to your template allows us to hide it. The good news is that it’s not against Blogger’s TOS so it’s not illegal to do. I read a post recently by Blogger Support that stated
While it’s not officially against our TOS, we discourage folks from removing it because we think it’s a great feature with more improvements to come. Follow the above instructions at your own peril, as Blogger controls the TOS and has been known to change it.
So the change you want to make is to the stylesheet. First make sure you backup your current template just in case you make a mistake. Click on the “Download Full Template” link ( go to “Template” => “Edit HTML”) and save it locally. Next, from within your template code you want to scroll down until you find ]]></b:skin> and stop. Then you’ll want to add this line of code right above this line.

#navbar-iframe {height:0px;visibility:hidden;display:none}
 
So once you’re done, it should look like this:
 
#navbar-iframe {height:0px;visibility:hidden;display:none}

]]></b:skin>
 
After that, save your template and view your blog. The top Blogger navbar should have disappeared! Looks much better now doesn’t it? If you ever want to add the navbar back, it’s simple. Just remove the line of code we just added. Also, if you ever switch templates, make sure to follow these instructions again because it needs to be done with each new template you use.

How to Cancel or Delete A Facebook Friend Request You Sent

It's time to
 cancel your request!
It's time to cancel your request!
blogs.trb.com
User-Submitted Article
Facebook is a great people connector in a way that you can search for people you know on the site and send a friend request to them.

And 'though some of us Facebook users, logs in and spend time on Facebook everyday, some people are just too busy to check on their accounts, or they're not just into Facebook that much. And adds to it that if these people you sent friend requests are new to using Facebook, they might still be finding their way around the site before they would notice a "friend request" alert.

But if the case is that you and some of your Facebook friends sent a friend request to a user, and you had read on the homepage: "Alice Whatever" "Hedi L." and so on are now friends with "That" ( or the same person you sent friend invite) this only means that the person already accepted your friends friend request.

But how come you aren't friends with her/him yet? This could be a heads up! A way the person choose for your friend request to just "sit there" on the request list instead of ignoring it.

If you got the feeling that it is time to cancel the friend invite for whatever reason, here's an easy to follow "how to" tutorial on how to delete the awaiting friend request you sent on Facebook.
Difficulty: Easy

Instructions

Things You'll Need:

  • logged in to Facebook account

  1. 1
    Log in to account.
     
    Log in to account.
    LOG-IN to your Facebook account.

  2. 2
    Go to account menu.
     
    Go to account menu.
    CLICK on "Account" on the top right corner on Facebook homepage. This will open a sub menu. CLICK on "Edit Friends."

  3. 3
    Access
     
    Access
    CLICK on "Friends" under "Lists" section. Clicking "Friends" will show all friends on your list.

  4. 4
    Cancel request.
     
    Cancel request.
    Scroll down and find the pending or awaiting friend request you sent that you want to delete or cancel.

    CLICK the X button once you found the person you wanted to cancel the friend invite.

  5. 5
    Confirm removal.
     
    Confirm removal.
    CLICK on "Remove" once the confirmation box popped up to confirm that you had made up your mind and wanted to delete the friend request.

How to Cancel a Pending Friend Request on Facebook

It's your worst nightmare. You've sent a Facebook friend request to someone from your past- maybe an ex lover or a long lost friend- that you realize afterwards, you really don't want to hear from. What to do? Follow these tips to make that pending friend request nothing more than a bad memory!
Difficulty: Moderately Easy

Instructions

Things You'll Need:

  • Computer with internet access
  • Facebook account
  • A clear mind

  1. 1
    Log on to your account at www.facebook.com

  2. 2
    Do a search for the name of the person you inadvertently Friend Requested by typing their name in the Search box.

  3. 3
    If your friend request is still pending, it should say Awaiting Friend Confirmation under their name on their profile page. Or, if their profile page is private, it will say Friend Requested next to their name on the main search page

  4. 4
    Unfortunately, Facebook does not have a button to cancel a friend request-- but there is a way around it! Go to Settings at the top of your homepage.

  5. 5
    Click on Privacy Settings.

  6. 6
    Click on Manage under the Privacy tab.

  7. 7
    At the bottom, find the Block People option.

  8. 8
    Type in the name of the person that you do not want to be friends with.

  9. 9
    Click "Block". The person is now blocked from your account.

  10. 10
    Now go back and type their name in the box again to unblock them.

  11. 11
    The pending friend request will disappear from their profile page and they will never know that you temporarily "blocked" them.

  12. 12
    Also, you can opt to keep the person blocked from your account permanently by omitting the Unblock step. They will have no access to your profile and no option to ever send you a friend request!

  13. 13
    Whew! Disaster averted!

How To Edit, Add And Remove labels In Multiple Blogger Posts At Once

n this post i will share with you a function available to you on blogger that allows you to edit, add and remove labels to all your blog posts or selected posts at once.This is a feature i don't think many are aware of and can save a lot of time and effort if you wish to manage your labels.So i think the best way to do this is to show you how to add a label to all your blog posts at once explaining with screen shots as i go.Then i will explane how to add or remove labels in just a number of selected posts .

Lets do it:

OK so i have decided to add a label to all my posts here's how i do it:

1.Click 'Edit posts' for your blog you will go to this page:

spice up your blog

2.To add our new label we do the following:
(See image below)

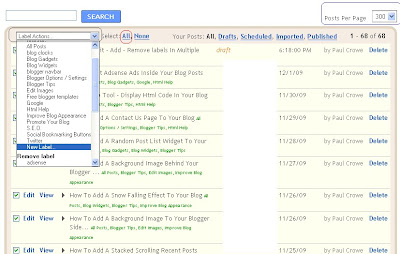
*Set the 'posts per page' in the top right to 300.
*In the top left click select 'All'.
*Click the 'Label actions..' drop down menu.
*Choose 'New Label..'


spice your blog

3.You will get this pop up window:

*Enter the new label in the area provided and click OK.
*Your new label has been added to all your posts.


how to spice up your blog

To remove a label from all your posts:

Simply follow the steps above but this time..

When you click the 'Label Actions' Drop down menu scroll down to 'Remove Label'
Select the label you wish to remove, it will be automatically removed from all your posts.

Add or remove labels from selected posts.

If you want to edit labels on just a few selected posts:

Instead of clicking 'select all' click the check box beside the posts you want to add or remove labels to as shown below :

blogger labels

Now use the drop down menu to add or remove labels to those posts.

This should help speed up the process of editing the labels on you blog.

If you need more help leave a comment below.

How To Add A Featured Posts With Thumbnails Gadget To Your Blog

In this post i will show you how to add a Featured Post list to your blog.There are a number of reasons you may want to display featured posts, the main reason would be to have a list of your best posts easily available expecially to new visitors.This would keep new visitors on your blog and possabley turn them into Rss subscribers or followers.I like to have a list of the good posts on differant subjects in my featured posts gadget, this really shows the varity available.

First of all this widget uses a similar method as used in the recent posts with thumbnails widget, if you arrieved here from a search looking for the recent posts widget you will be glad to know it is actually available in the Blogger gadget gallery and you can add it in seconds without the need for any code, i will show you how at the bottom of the post.

Preview

Below is a preview of the featured post widget on this blog at the time of writing :


Featured Posts With Thumbnails


Adding the featured posts gadget

Step 1. In your dashboard click 'Layout' > 'Add a Gadget'

Blogger layout

add a gadget blogger


Step 2 . You will get a pop up menu - from the pop up menu choose 'Html/Javascript'

add html javascript blogger


Step 3. Copy the code below and paste it into the 'Html/JavaScript' area in the pop up :

<a href="http://www.spiceupyourblog.com"target="_blank"><img src="https://blogger.googleusercontent.com/img/b/R29vZ2xl/AVvXsEih8hIeuiiEtXjyIjxyNSkq_EnDOEQypRLyw3Wb07OXOzMDscR6dHYuBOGJRDtWlcIoVQgLCsMF6x33ObFPQ9hYMlE_1u0yrs8YRMIJZrspR5oJ9P5tWi7ym-mbn2L2HJSWZaqMY6r069DQ/s320/featured+posts+sig.png" border="0" alt="Featured Posts Spice up your blog" /></a><br /><style>img.recent_thumb {padding:1px;width:55px;height:55px;border:0; float:right;margin:0 0 5px 10px;}.recent_posts_with_thumbs {float: left;width: 100%;min-height: 70px;margin: 5px 0px 5px 0px;padding: 0;font-size:12px;}ul.recent_posts_with_thumbs li {padding-bottom:5px;padding-top:5px;min-height:65px;}.recent_posts_with_thumbs a {text-decoration:none;}.recent_posts_with_thumbs strong {font-size:10px;}</style><script style="text/javascript" src="http://spiceupyourblogextras.googlecode.com/files/spicefeaturedposts.js"></script><script style="text/javascript">var numposts = 6;var showpostthumbnails = true;var displaymore = true;var displayseparator = true;var showcommentnum = true;var showpostdate = true;var showpostsummary = false;var numchars = 50;</script><script src="http://www2.blogger.com/feeds/8563022360444004311/posts/default/-/Featured?orderby=published&alt=json-in-script&callback=showrecentpostswiththumbs"></script>
Edits : You must make one change to the code - In order for the gadget to display the posts for your blog you must add your blogger I.D.

To find your Blogger I.D. simply go to your layout page, posting page or any of the pages you access from your dashboard and copy your I.D. from the address bar at the top of the page.

Your Blog I.D. is a the number that appears in the URL - This is how your I.D. will be displayed :


Find your blogger i.d.

Optional Extra Changes :You also have the option to make some extra changes to the appearance of the gadget - all the code in bold can be edited :

Numposts =6 - Change how many posts are displayed
showpostsummary = false - Display the first few lines of the post below the title on the gadget, change to true to activate this setting.
numchars = 50 - If you decide to show the summary this setting lets you choose how many charaters are displayed in the summary.
showpostdate = true - The date of the post is displayed, change to false to hide the date.
Also included are the settings to show thumbnails and show the ammount of comments you can toggle these settings with 'True' and 'False'.

Step 4. Click save - You can now drag and drop your new gadget into place on the home page.

Adding Posts To The Featured Posts Gadget

Now you must choose what posts to show on your featured posts gadget - Your new featured posts gadget displays posts using a label.

Add the label Featured to any posts you want displayed on the featured posts gadget for your blog.The gadget will then display the last 6 posts using that label or the number of posts you choose to display.If You Dont Add The Label No Posts Will Be Displayed.

This post will show you how to add and remove multible labels from your posts at once, or you can just edit the posts and add the label.

This is a cool gadget and i have been using it for sometime but i cant remember exactly were i came across it, so for now i will give credit to the creator of the original recent posts with thumnails - BloggerTricks

InfoRemember you can get all these tips sent directly to your email and stay a step ahead.Its a quick and easy service Provided for Free by Google.Just fill in the Email form below the post.
If you need extra help on this or any tutorial just leave a comment, I love comments and feedback so this Blog is Do-Follow - when you comment here it helps Your Blogs Google rank !


And thats a good introduction to quickly adding the recent posts with thumbnails - Heres the steps.

As above in your dasboard click > Layout > Add a gadget.

This time use the search bar to look for 'Recent Posts' as shown below :


The search will return a list of results, when you scroll down you will find The 'Recent Posts' gadget from Blogger Buster and The 'Advanced Recent Posts' from Blogger widgets as shown below :


Choose the 'Advanced' version circled in red above.

Note : Be sure to add your URL in place of the Blogger Plugins URL and edit the other settings were required - Then save.


That's the featured posts with thumbnails added to your blog and an easy way to add the recent posts with thumbnails, will they be seen on your blog ?

There are lots more cool Blogger gadgets available check them out.

If you run into trouble just leave a comment I'm glad to help.

Show Only Post Title In Blogger Label-Archive-Home Pages

How to Show Only Post Title In Blogger Label page,Archive Pages or even on home page of your blog.You sure would have seen many blogs using this trick to show only there post title in any page they want.Wordpress blogs easily do this using various plugins available but we bloggers also now can make it work in our blogs as its very simple tutorial to implement.

Here is an hack how to show post title in any desired page of an blog.

Please Read this tutorial very carefully as it is very easy but i am telling you two ways of doing which have different results.You can use one way at time or both ways at time but results will be different.I will try to make it very simple for you with what would be the result to the blog with each step, so read carefully.

1.Login to Blogger
2.Go To LAYOUT
3.Then Click On Edit HTML
4.Check Mark Expand Widgets
5.Press Ctrl+F

Now search For below code line in red :-

<b:include data='post' name='post'/>

And Replace it with Below Codes:-


<b:if cond='data:blog.homepageUrl
!= data:blog.url'>


<b:if cond='data:blog.pageType != "item"'>


<h3 class='post-title'><a expr:href='data:post.url'><data:post.title/></a></h3>


<b:else/>


<b:include data='post' name='post'/>


</b:if>


<b:else/>


<b:include data='post' name='post'/>


</b:if>


Now Preview Your template. If it accepts Your Html.Then Save It.

Now open your blog and click on the label or archive page of your blog it will show only post title . For demo check the category page of this Blog.

I hope you will be satisfied with it.This is one way.

Now there is another way of doing it but the results are different.

If you want to show only title of posts in your blog home page also,then only follow this way and implemet it.If you want only label page to show post title just get stoppd after reading first way only.

Now the second way to show only post title in blogger home page too.

1.Login to Blogger
2.Go To LAYOUT
3.Then Click On Edit HTML
4.Check Mark EXpand Widgets
5.Press Ctrl+F

Now search for this line in red :-

<p><data:post.body/></p>

After finding this line replace it with below codes :-


<b:if cond='data:blog.pageType == "item"'>
<p><data:post.body/></p>
</b:if>


This will show only post title on all pages of blogger including homepage label and archive pages.

One of my reader asked to show post title only in archive pages so i am placing code for him

Just use these codes to replace the above red line in place of above codes.


<b:if cond='data:blog.pageType == "index"'>
<p><data:post.body/></p>
</b:if>


And if you dont want to use post titles in archive pages use archive in place of index in above codes that's the only word making basic difference between the codes.

*Note-If you are using read more hack in your blogger you will get above red line twice.So replace only the line that appears first in your blog html code and leave second one as it is.

And then preview your template,if its ok. Save It.

The result would be like this in your blog.

Now i will explain difference in both hacks,so dont get confused.

1)Using only 1st way show post title in only label pages and archive pages.
2)Using only second way will show post title in your blog home page and label pages too but the result in label pages is not so beautiful as it shows Post footer links too like it shows in home page.
3)Install both ways in your blog together if you want to show post title in all of your blog pages and give it beautiful look, like have done it in my Earn Money Blog.

I hope now it have been clear how to use both, if still confused just implement 1st way and if you want post title in home page also implement 2nd way also. Thats' it.
If still any problem leave your comments.

Good Luck !

How to Display Only Post Titles on Main, Search and Aensure the serchive Pages

Many bloggers choose to clean up the layout of their non-item pages by choosing to display only the post titles. This has the effect of teasing readers with a catchy title, encouraging them to link through and read the main article, while ensuring the main pages feature a clean and organized layout.
Blogger blogs do not have the function of displaying excerpts on the home, archive and search pages in the same manner as Wordpress blogs. While there are various techniques you could use to display archives, most of these are complicated and require HTML editing for each post. Choosing instead to display post titles is much simpler and requires no further editing of the HTML when installed.
In this post, I’ll explain how you can easily edit your Blogger template to display only the post titles for your blog posts on the home, archive and search pages of your blog.

Step 1: Back up your Blogger Template

Before making any changes to the HTML code of your blogger template, it is essential that you first perform a complate back-up of your existing template. Then if you happen to make a mistake, you can easily restore this working template to your blog.
To make a full back-up of your Blogger template, go to Layout>Edit HTML in your Blogger dashboard and click on the “Download full template” link near the top of the page.
screen-shot01-apr-13
This will prompt you to save your template as an XML file to your computer. You can change the file-name to something you will remember more easily. Be sure to save in a location you can easily find if you need your back-up template!

Step 2: Check you have enabled the setting for post pages

“Post Pages” are unique pages in your blog which are used to display individual posts. Most Blogger blogs have this setting activated by default, but it’s worth checking to be sure this hack will work once installed.
To check this, go to Settings>Archiving in your Blogger dashboard and ensure the setting for “Enable post pages” is set to “Yes”. Be sure to save any changes before you leave this page.
screen-shot02-apr-13

Step 3: Add conditional tags to your Blogger template

This is the most complicated part of editing your template to display only the post titles on non-item pages.
Go to Layout>Edit HTML in your Blogger dashboard and ensure you have checked the “Expand widget templates” box. This enables us to find the section of code we need to edit.
screen-shot03-apr-13
Now using your browser’s search function, locate the following tag:
<data:post.body/>
You may find this tag is surrounded by other tags, such as <p> or <div> tags. You must leave these in place when we add the conditional tags. The lines we will add to the template need to wrap around the line in your template which contains the <data:post.body/> tag.
Add the following line just above that which contains the
<data:post.body/> tag:

<b:if cond='data:blog.pageType != &quot;item&quot;'>

Then just after the <data:post.body/> line, add this tag:

</b:if>
Once you have made these edits, the section in your template should look something like this:

<b:if cond='data:blog.pageType != &quot;item&quot;'>
<p><data:post.body/></p>
</b:if>


Now preview your template. If you have added the code correctly, you should now see that only the post titles display on the home page of your blog. If all is well, proceed to save your template. Then visit your blog in your browser. When you view the home, archive or search pages, only the titles of your posts will appear. By clicking on a post title, you will be taken to the item page, in which case the entire post will appear.
The conditional code we have added to the template means that the post content is not merely hidden (as in the case of post summary hacks), it does not appear at all in the source code. This also means that non-item pages can load more quickly as there is less content to load and no post images – both of which can cause blog pages to load more slowly, particularly for those not using a Broadband connection for their internet browsing.
That’s all there is to it! It’s far simpler to display only post titles in your Blogger powered blog than you would think.
I hope this tutorial has proved useful for you! Please feel free to add your comments or suggestions below.

How To Add The Blogger “Read More” Expandable Posts Link

This is a pretty popular Blogger hack that lots of people have asked me about. Instead of answering to each email individually, I thought it would make more sense to write an article about it.
With this hack, you can choose to display a select amount of text from the beginning of each post as a teaser instead of showing the entire post on the front page of your blog. Then when people want to read the rest of the post, they can click a “read more” link to see the full post. This is very handy if you have lots of long articles all on one page. (Note that you’ll need to have post pages enabled in order to make this feature work.)

Step #1 – Update Your Template Code

First you need to edit your existing code so I recommend copying and pasting it into notepad or any text editor. Also, it’s smart at this point to create a backup of your template just in case something goes wrong. Now do a search (CTRL + F) within the text editor for the following code post-header-line-1. This is the default code that Blogger includes but some custom templates remove or change this code so you might have trouble finding it. If you can’t locate this text then try searching for <data:post.body/> instead. Your template will for sure have this since it’s the tag that actually prints the body of your post.
Now depending on which code you were able to find will determine how easy the next steps will be. You might need to do some detective work first in order to get this working properly in your custom template. The idea is to get this new code into your template before the <data:post.body/> tag. Keep reading and hopefully the explanation will illustrate the concept clear enough so you are able to adapt this hack to your custom template.
Add the following code below the <div class=’post-header-line-1′/> and <div class=’post-header-line’> tags if you’ve got both.
<b:if cond='data:blog.pageType == "item"'>
<style>.fullpost{display:inline;}</style>
<p><data:post.body/></p>
<b:else/>
<style>.fullpost{display:none;}</style>

The result should look something like this:
new-code-block.png
If you don’t have the default <div class='post-header-line-1'/> tag then your result should look something like this instead. This is how it would be done in the MushBlue Blogger custom template:
new-code-block-mush.png
Notice in both examples that the code in yellow and the <data:post.body/> tags are the same — it’s just tag above it that will differ based on the template you’re using.
Now let’s add one more bit of code which will actually create the “read more” link in your post. This code will go below the <data:post.body/> tag so copy the following and paste it in. Feel free to change the “Read more…” text to whatever you want the link to look like. Be careful not to delete any other code during this process.
<b:if cond='data:blog.pageType != "item"'><br />
<a expr:href='data:post.url'>Read more...</a>
</b:if>
</b:if>

Yes, there are supposed to be two </b:if> tags in the above code so don’t think it’ s a mistake. The result should look like this:
new-code-block-2.png
This code will be the same no matter what template you are using. Just make sure it goes below the <data:post.body/> as shown in the image above.
Now let’s look at what the final result should be. Here’s the updated code block you just worked on all put together:
new-code-block-3.png
Ok, you’re all done editing the template code. Paste it back into your Blogger html window and save it. If you get an error, you made a mistake. The most common mistake is to accidentally delete a > or < while pasting in the new code. If it saved successfully, it’s time to move onto the next step and modify a quick Blogger format setting.

Step #2 – Add a Class Tag in Your Default Post Template

For this step, you need to navigate in your Blogger account to “Settings” => “Formatting” and scroll all the way down to the bottom. It’s the last option called “Post Template”. You’re going to paste in the following code:
<span class="fullpost">
</span>
You’ll want to keep the spaces in there which will make sense later. After you save this, it will look like this:
post-template2.png

Step #3 – Create a New Post

Ok, we’ve got everything all setup so it’s time to go and test it out. Hopefully you’ve got a new post in mind for your blog. If not, then we’ll just create a test post which you can later delete. When you click on the “Posting” tab, you’ll notice that the post text area is now pre-populated with the <span class=”fullpost”> and </span> tags. If not, then you didn’t save it properly so go back and re-read step #2.
So when writing your new post, anything you put above the <span class=”fullpost”> tag will be the teaser text. The main body of your post needs to go in between the <span class=”fullpost”> and </span> tags in order for the “read more…” link to work properly. See the screenshot below. Sometimes pictures illustrate better than words.
post-template-result2.png
Now publish or preview your post to see the “read more” hack working on your blog. If it doesn’t show up for some reason, go back and run through the steps again. Most likely you pasted the code blocks in the wrong places. It’s difficult to troubleshoot these issues since each template can be unique so please make sure to double-check your template before asking for help in the comments section below.
Here’s the live post with the “read more…” link properly working based on the text I used above in the post text area.
post-results.png

Additional Info

If you want to go back and update your old posts with this new “read more…” feature you can. Just go back and edit each post manually. Essentially you’ll need to paste in the <span class=”fullpost”> and </span> tags breaking apart the post into two parts.
For some posts, you might not want to use this feature at all. If that’s the case, just delete the <span class=”fullpost”> and </span> tags from within your new post text area. Then your new post will show up entirely just like it used to before you implemented this hack. Enjoy!
Related Posts with Thumbnails

Pages