Featured | computer-celltricks

computer-celltricks: Featured
Showing posts with label Featured. Show all posts

Wednesday, September 15, 2010

How To Edit, Add And Remove labels In Multiple Blogger Posts At Once

n this post i will share with you a function available to you on blogger that allows you to edit, add and remove labels to all your blog posts or selected posts at once.This is a feature i don't think many are aware of and can save a lot of time and effort if you wish to manage your labels.So i think the best way to do this is to show you how to add a label to all your blog posts at once explaining with screen shots as i go.Then i will explane how to add or remove labels in just a number of selected posts .

Lets do it:

OK so i have decided to add a label to all my posts here's how i do it:

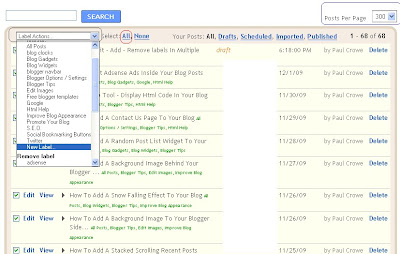
1.Click 'Edit posts' for your blog you will go to this page:

spice up your blog

2.To add our new label we do the following:
(See image below)

*Set the 'posts per page' in the top right to 300.
*In the top left click select 'All'.
*Click the 'Label actions..' drop down menu.
*Choose 'New Label..'


spice your blog

3.You will get this pop up window:

*Enter the new label in the area provided and click OK.
*Your new label has been added to all your posts.


how to spice up your blog

To remove a label from all your posts:

Simply follow the steps above but this time..

When you click the 'Label Actions' Drop down menu scroll down to 'Remove Label'
Select the label you wish to remove, it will be automatically removed from all your posts.

Add or remove labels from selected posts.

If you want to edit labels on just a few selected posts:

Instead of clicking 'select all' click the check box beside the posts you want to add or remove labels to as shown below :

blogger labels

Now use the drop down menu to add or remove labels to those posts.

This should help speed up the process of editing the labels on you blog.

If you need more help leave a comment below.

How To Add A Featured Posts With Thumbnails Gadget To Your Blog

In this post i will show you how to add a Featured Post list to your blog.There are a number of reasons you may want to display featured posts, the main reason would be to have a list of your best posts easily available expecially to new visitors.This would keep new visitors on your blog and possabley turn them into Rss subscribers or followers.I like to have a list of the good posts on differant subjects in my featured posts gadget, this really shows the varity available.

First of all this widget uses a similar method as used in the recent posts with thumbnails widget, if you arrieved here from a search looking for the recent posts widget you will be glad to know it is actually available in the Blogger gadget gallery and you can add it in seconds without the need for any code, i will show you how at the bottom of the post.

Preview

Below is a preview of the featured post widget on this blog at the time of writing :


Featured Posts With Thumbnails


Adding the featured posts gadget

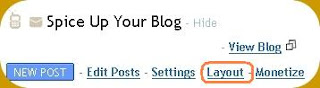
Step 1. In your dashboard click 'Layout' > 'Add a Gadget'
Blogger layout

add a gadget blogger


Step 2 . You will get a pop up menu - from the pop up menu choose 'Html/Javascript'

add html javascript blogger


Step 3. Copy the code below and paste it into the 'Html/JavaScript' area in the pop up :

<a href="http://www.spiceupyourblog.com"target="_blank"><img src="https://blogger.googleusercontent.com/img/b/R29vZ2xl/AVvXsEih8hIeuiiEtXjyIjxyNSkq_EnDOEQypRLyw3Wb07OXOzMDscR6dHYuBOGJRDtWlcIoVQgLCsMF6x33ObFPQ9hYMlE_1u0yrs8YRMIJZrspR5oJ9P5tWi7ym-mbn2L2HJSWZaqMY6r069DQ/s320/featured+posts+sig.png" border="0" alt="Featured Posts Spice up your blog" /></a><br /><style>img.recent_thumb {padding:1px;width:55px;height:55px;border:0; float:right;margin:0 0 5px 10px;}.recent_posts_with_thumbs {float: left;width: 100%;min-height: 70px;margin: 5px 0px 5px 0px;padding: 0;font-size:12px;}ul.recent_posts_with_thumbs li {padding-bottom:5px;padding-top:5px;min-height:65px;}.recent_posts_with_thumbs a {text-decoration:none;}.recent_posts_with_thumbs strong {font-size:10px;}</style><script style="text/javascript" src="http://spiceupyourblogextras.googlecode.com/files/spicefeaturedposts.js"></script><script style="text/javascript">var numposts = 6;var showpostthumbnails = true;var displaymore = true;var displayseparator = true;var showcommentnum = true;var showpostdate = true;var showpostsummary = false;var numchars = 50;</script><script src="http://www2.blogger.com/feeds/8563022360444004311/posts/default/-/Featured?orderby=published&alt=json-in-script&callback=showrecentpostswiththumbs"></script>
Edits : You must make one change to the code - In order for the gadget to display the posts for your blog you must add your blogger I.D.

To find your Blogger I.D. simply go to your layout page, posting page or any of the pages you access from your dashboard and copy your I.D. from the address bar at the top of the page.

Your Blog I.D. is a the number that appears in the URL - This is how your I.D. will be displayed :


Find your blogger i.d.

Optional Extra Changes :You also have the option to make some extra changes to the appearance of the gadget - all the code in bold can be edited :

Numposts =6 - Change how many posts are displayed
showpostsummary = false - Display the first few lines of the post below the title on the gadget, change to true to activate this setting.
numchars = 50 - If you decide to show the summary this setting lets you choose how many charaters are displayed in the summary.
showpostdate = true - The date of the post is displayed, change to false to hide the date.
Also included are the settings to show thumbnails and show the ammount of comments you can toggle these settings with 'True' and 'False'.

Step 4. Click save - You can now drag and drop your new gadget into place on the home page.

Adding Posts To The Featured Posts Gadget

Now you must choose what posts to show on your featured posts gadget - Your new featured posts gadget displays posts using a label.

Add the label Featured to any posts you want displayed on the featured posts gadget for your blog.The gadget will then display the last 6 posts using that label or the number of posts you choose to display.If You Dont Add The Label No Posts Will Be Displayed.

This post will show you how to add and remove multible labels from your posts at once, or you can just edit the posts and add the label.

This is a cool gadget and i have been using it for sometime but i cant remember exactly were i came across it, so for now i will give credit to the creator of the original recent posts with thumnails - BloggerTricks

InfoRemember you can get all these tips sent directly to your email and stay a step ahead.Its a quick and easy service Provided for Free by Google.Just fill in the Email form below the post.
If you need extra help on this or any tutorial just leave a comment, I love comments and feedback so this Blog is Do-Follow - when you comment here it helps Your Blogs Google rank !


And thats a good introduction to quickly adding the recent posts with thumbnails - Heres the steps.

As above in your dasboard click > Layout > Add a gadget.

This time use the search bar to look for 'Recent Posts' as shown below :


The search will return a list of results, when you scroll down you will find The 'Recent Posts' gadget from Blogger Buster and The 'Advanced Recent Posts' from Blogger widgets as shown below :


Choose the 'Advanced' version circled in red above.

Note : Be sure to add your URL in place of the Blogger Plugins URL and edit the other settings were required - Then save.


That's the featured posts with thumbnails added to your blog and an easy way to add the recent posts with thumbnails, will they be seen on your blog ?

There are lots more cool Blogger gadgets available check them out.

If you run into trouble just leave a comment I'm glad to help.

Show Only Post Title In Blogger Label-Archive-Home Pages

How to Show Only Post Title In Blogger Label page,Archive Pages or even on home page of your blog.You sure would have seen many blogs using this trick to show only there post title in any page they want.Wordpress blogs easily do this using various plugins available but we bloggers also now can make it work in our blogs as its very simple tutorial to implement.

Here is an hack how to show post title in any desired page of an blog.

Please Read this tutorial very carefully as it is very easy but i am telling you two ways of doing which have different results.You can use one way at time or both ways at time but results will be different.I will try to make it very simple for you with what would be the result to the blog with each step, so read carefully.

1.Login to Blogger
2.Go To LAYOUT
3.Then Click On Edit HTML
4.Check Mark Expand Widgets
5.Press Ctrl+F

Now search For below code line in red :-

<b:include data='post' name='post'/>

And Replace it with Below Codes:-


<b:if cond='data:blog.homepageUrl
!= data:blog.url'>


<b:if cond='data:blog.pageType != "item"'>


<h3 class='post-title'><a expr:href='data:post.url'><data:post.title/></a></h3>


<b:else/>


<b:include data='post' name='post'/>


</b:if>


<b:else/>


<b:include data='post' name='post'/>


</b:if>


Now Preview Your template. If it accepts Your Html.Then Save It.

Now open your blog and click on the label or archive page of your blog it will show only post title . For demo check the category page of this Blog.

I hope you will be satisfied with it.This is one way.

Now there is another way of doing it but the results are different.

If you want to show only title of posts in your blog home page also,then only follow this way and implemet it.If you want only label page to show post title just get stoppd after reading first way only.

Now the second way to show only post title in blogger home page too.

1.Login to Blogger
2.Go To LAYOUT
3.Then Click On Edit HTML
4.Check Mark EXpand Widgets
5.Press Ctrl+F

Now search for this line in red :-

<p><data:post.body/></p>

After finding this line replace it with below codes :-


<b:if cond='data:blog.pageType == "item"'>
<p><data:post.body/></p>
</b:if>


This will show only post title on all pages of blogger including homepage label and archive pages.

One of my reader asked to show post title only in archive pages so i am placing code for him

Just use these codes to replace the above red line in place of above codes.


<b:if cond='data:blog.pageType == "index"'>
<p><data:post.body/></p>
</b:if>


And if you dont want to use post titles in archive pages use archive in place of index in above codes that's the only word making basic difference between the codes.

*Note-If you are using read more hack in your blogger you will get above red line twice.So replace only the line that appears first in your blog html code and leave second one as it is.

And then preview your template,if its ok. Save It.

The result would be like this in your blog.

Now i will explain difference in both hacks,so dont get confused.

1)Using only 1st way show post title in only label pages and archive pages.
2)Using only second way will show post title in your blog home page and label pages too but the result in label pages is not so beautiful as it shows Post footer links too like it shows in home page.
3)Install both ways in your blog together if you want to show post title in all of your blog pages and give it beautiful look, like have done it in my Earn Money Blog.

I hope now it have been clear how to use both, if still confused just implement 1st way and if you want post title in home page also implement 2nd way also. Thats' it.
If still any problem leave your comments.

Good Luck !

How to Display Only Post Titles on Main, Search and Aensure the serchive Pages

Many bloggers choose to clean up the layout of their non-item pages by choosing to display only the post titles. This has the effect of teasing readers with a catchy title, encouraging them to link through and read the main article, while ensuring the main pages feature a clean and organized layout.
Blogger blogs do not have the function of displaying excerpts on the home, archive and search pages in the same manner as Wordpress blogs. While there are various techniques you could use to display archives, most of these are complicated and require HTML editing for each post. Choosing instead to display post titles is much simpler and requires no further editing of the HTML when installed.
In this post, I’ll explain how you can easily edit your Blogger template to display only the post titles for your blog posts on the home, archive and search pages of your blog.

Step 1: Back up your Blogger Template

Before making any changes to the HTML code of your blogger template, it is essential that you first perform a complate back-up of your existing template. Then if you happen to make a mistake, you can easily restore this working template to your blog.
To make a full back-up of your Blogger template, go to Layout>Edit HTML in your Blogger dashboard and click on the “Download full template” link near the top of the page.
screen-shot01-apr-13
This will prompt you to save your template as an XML file to your computer. You can change the file-name to something you will remember more easily. Be sure to save in a location you can easily find if you need your back-up template!

Step 2: Check you have enabled the setting for post pages

“Post Pages” are unique pages in your blog which are used to display individual posts. Most Blogger blogs have this setting activated by default, but it’s worth checking to be sure this hack will work once installed.
To check this, go to Settings>Archiving in your Blogger dashboard and ensure the setting for “Enable post pages” is set to “Yes”. Be sure to save any changes before you leave this page.
screen-shot02-apr-13

Step 3: Add conditional tags to your Blogger template

This is the most complicated part of editing your template to display only the post titles on non-item pages.
Go to Layout>Edit HTML in your Blogger dashboard and ensure you have checked the “Expand widget templates” box. This enables us to find the section of code we need to edit.
screen-shot03-apr-13
Now using your browser’s search function, locate the following tag:
<data:post.body/>
You may find this tag is surrounded by other tags, such as <p> or <div> tags. You must leave these in place when we add the conditional tags. The lines we will add to the template need to wrap around the line in your template which contains the <data:post.body/> tag.
Add the following line just above that which contains the
<data:post.body/> tag:

<b:if cond='data:blog.pageType != &quot;item&quot;'>

Then just after the <data:post.body/> line, add this tag:

</b:if>
Once you have made these edits, the section in your template should look something like this:

<b:if cond='data:blog.pageType != &quot;item&quot;'>
<p><data:post.body/></p>
</b:if>


Now preview your template. If you have added the code correctly, you should now see that only the post titles display on the home page of your blog. If all is well, proceed to save your template. Then visit your blog in your browser. When you view the home, archive or search pages, only the titles of your posts will appear. By clicking on a post title, you will be taken to the item page, in which case the entire post will appear.
The conditional code we have added to the template means that the post content is not merely hidden (as in the case of post summary hacks), it does not appear at all in the source code. This also means that non-item pages can load more quickly as there is less content to load and no post images – both of which can cause blog pages to load more slowly, particularly for those not using a Broadband connection for their internet browsing.
That’s all there is to it! It’s far simpler to display only post titles in your Blogger powered blog than you would think.
I hope this tutorial has proved useful for you! Please feel free to add your comments or suggestions below.

How To Add The Blogger “Read More” Expandable Posts Link

This is a pretty popular Blogger hack that lots of people have asked me about. Instead of answering to each email individually, I thought it would make more sense to write an article about it.
With this hack, you can choose to display a select amount of text from the beginning of each post as a teaser instead of showing the entire post on the front page of your blog. Then when people want to read the rest of the post, they can click a “read more” link to see the full post. This is very handy if you have lots of long articles all on one page. (Note that you’ll need to have post pages enabled in order to make this feature work.)

Step #1 – Update Your Template Code

First you need to edit your existing code so I recommend copying and pasting it into notepad or any text editor. Also, it’s smart at this point to create a backup of your template just in case something goes wrong. Now do a search (CTRL + F) within the text editor for the following code post-header-line-1. This is the default code that Blogger includes but some custom templates remove or change this code so you might have trouble finding it. If you can’t locate this text then try searching for <data:post.body/> instead. Your template will for sure have this since it’s the tag that actually prints the body of your post.
Now depending on which code you were able to find will determine how easy the next steps will be. You might need to do some detective work first in order to get this working properly in your custom template. The idea is to get this new code into your template before the <data:post.body/> tag. Keep reading and hopefully the explanation will illustrate the concept clear enough so you are able to adapt this hack to your custom template.
Add the following code below the <div class=’post-header-line-1′/> and <div class=’post-header-line’> tags if you’ve got both.
<b:if cond='data:blog.pageType == "item"'>
<style>.fullpost{display:inline;}</style>
<p><data:post.body/></p>
<b:else/>
<style>.fullpost{display:none;}</style>

The result should look something like this:
new-code-block.png
If you don’t have the default <div class='post-header-line-1'/> tag then your result should look something like this instead. This is how it would be done in the MushBlue Blogger custom template:
new-code-block-mush.png
Notice in both examples that the code in yellow and the <data:post.body/> tags are the same — it’s just tag above it that will differ based on the template you’re using.
Now let’s add one more bit of code which will actually create the “read more” link in your post. This code will go below the <data:post.body/> tag so copy the following and paste it in. Feel free to change the “Read more…” text to whatever you want the link to look like. Be careful not to delete any other code during this process.
<b:if cond='data:blog.pageType != "item"'><br />
<a expr:href='data:post.url'>Read more...</a>
</b:if>
</b:if>

Yes, there are supposed to be two </b:if> tags in the above code so don’t think it’ s a mistake. The result should look like this:
new-code-block-2.png
This code will be the same no matter what template you are using. Just make sure it goes below the <data:post.body/> as shown in the image above.
Now let’s look at what the final result should be. Here’s the updated code block you just worked on all put together:
new-code-block-3.png
Ok, you’re all done editing the template code. Paste it back into your Blogger html window and save it. If you get an error, you made a mistake. The most common mistake is to accidentally delete a > or < while pasting in the new code. If it saved successfully, it’s time to move onto the next step and modify a quick Blogger format setting.

Step #2 – Add a Class Tag in Your Default Post Template

For this step, you need to navigate in your Blogger account to “Settings” => “Formatting” and scroll all the way down to the bottom. It’s the last option called “Post Template”. You’re going to paste in the following code:
<span class="fullpost">
</span>
You’ll want to keep the spaces in there which will make sense later. After you save this, it will look like this:
post-template2.png

Step #3 – Create a New Post

Ok, we’ve got everything all setup so it’s time to go and test it out. Hopefully you’ve got a new post in mind for your blog. If not, then we’ll just create a test post which you can later delete. When you click on the “Posting” tab, you’ll notice that the post text area is now pre-populated with the <span class=”fullpost”> and </span> tags. If not, then you didn’t save it properly so go back and re-read step #2.
So when writing your new post, anything you put above the <span class=”fullpost”> tag will be the teaser text. The main body of your post needs to go in between the <span class=”fullpost”> and </span> tags in order for the “read more…” link to work properly. See the screenshot below. Sometimes pictures illustrate better than words.
post-template-result2.png
Now publish or preview your post to see the “read more” hack working on your blog. If it doesn’t show up for some reason, go back and run through the steps again. Most likely you pasted the code blocks in the wrong places. It’s difficult to troubleshoot these issues since each template can be unique so please make sure to double-check your template before asking for help in the comments section below.
Here’s the live post with the “read more…” link properly working based on the text I used above in the post text area.
post-results.png

Additional Info

If you want to go back and update your old posts with this new “read more…” feature you can. Just go back and edit each post manually. Essentially you’ll need to paste in the <span class=”fullpost”> and </span> tags breaking apart the post into two parts.
For some posts, you might not want to use this feature at all. If that’s the case, just delete the <span class=”fullpost”> and </span> tags from within your new post text area. Then your new post will show up entirely just like it used to before you implemented this hack. Enjoy!

Make mp3 files smaller without losing clarity.

Make mp3 files smaller without losing clarity.

If you don't already have a copy of MusicMatch Jukebox, download one from musicmatch.com. The "Plus" version has more features and burns CDs faster, but the free version works just fine for converting files

1. Install music match box and then restart your computer if it asks
2. open music matchbox and click file convert files
3. in the bottom right hand corner called 'destination type' change it to mp3 pro.
4.you can edit the bitrate but the higher the bitrate the bigger the size
5. choose the songs you want to convert and click start

If you want to try something different repeat step one and 2 and instead of making the destintion type mp3 pro make it 'mp3pro vbr'

again the lower the setting the smaller the size.

Free Mobile Bluetooth Hacker

Yes guys it is the super mobile bluetooth hacker
Once connected to a another phone via bluetooth you can:
- read his messages
- read his contacts
- change profile
- play his ringtone even if phone is on silent
- play his songs(in his phone)
- restart the phone
- switch off the phone
- restore factory settings
- change ringing volume
- And here comes the best
Call from his phone” it includes all call functions like hold etc.

Notes:
1.) When connecting devices use a code 0000
2.) Don’t forget to switch on your bluetooth before starting the program
What else you want
Just go and downlaod it

Download


enjoy and keep visiting us

How to find IMEI number and other trics.....

to find IMEI number ....
press
*#06# for IMEI,
*#92702689# for full details
etc......

Free Mobile Bluetooth softwares download


Bluetooth Applications to make ur Mobile Rocking..
This pack contains some of the best bluetooth applications like :-
FTP Superbluetooth hack 1.07,1.08;
Freejack,
Networker,
MobiLuck,
BT Explorer,
BT Enhancer etc..
Bluetooth Enhancer :More than one blue tooth connection at one time….
MobiLuck : also Named “Bluetooth Hunter”…Returns alert on the presence of Bluetooth near to you.
BlueJackX : spy work,and is work resorted,and steals files of the other device through Bluetooth.
Networker : Make it work in Conjugation with Mobiluck and see the magic :D
Nokia Data Transfer : Awesome application to transfer the entire DATA to another device By Bluetooth.
DreamChat : Chat through Bluetooth with Dream Chat.
FTP Super Bluetooth Hack : Program to control and read informations from other phone>>> http://www.4shared.com/file/29612048/adc08fcb/ftp_bt_108.html
Download All in One Bluetooth Pack:
http://www.4shared.com/file/32361100/f8401ee3/bluetooth.html

Codes of All mobiles

6600,N70,N72: *#7370#-phone format...

*#92702689#-serialnumber,made,purchasing date,repaired,life timer..

*#0000#-phone model...

*#2820#-blutooth info...

*#7780#- restore factory settings...

*3370#-battery...

*#7370#-phone format for all symbian60 phones..

Enjoy with these. I will comeback with new Codes......

China Mobile Secret Codes

China Mobile Secret Codes–Default user code : 1122, 3344, 1234, 5678
–Engineer mode : *#110*01#
–Factory mode : *#987#
–Enable COM port : *#110*01# -> Device -> Set UART -> PS Config -> UART1/115200
–Restore factory settings : *#987*99#
–LCD contrast : *#369#
–Software version : *#800#
–Software version : *#900#
–Set default language : *#0000# Send
–Set English language : *#0044# Send
–Set English [...]

How to trace the mobile number location in india

Hey Friend!!

Here I am giving you the link where you can put your number and you can see the location of the number like you put my number 9444182217.Then you will get the output something like this See the following figure. Not only mobile location, we can find the location of motor vesicles like 2 wheeler, 4 wheeler etc.., in this site, we can search in orkut also, by adding application.


http://trace.bharatiyamobile.com/index.php

Nokia Mobile Phone Secret Codes

Here are some the coolest & useful secret codes for your Nokia mobile phone, Ever wonder what code to use if you want to save the battery? What code to use to enhance a Weak signal? When was your phone manufactured?
Well here are the answers, A set of Nokia Mobile Secret codes that work with almost all the nokia phones, However use at your own discretion, We take absolutely no responsibilty, Since only a few codes worked with one of my phones, While on the other all of them worked.
Secret Nokia Cell Phone Unlock Codes

*#06# :
Opens up a new window showing the IMEI Number International Mobile Equipment Identity(Also Works with other phones)
*#7780# :
Resets The Factory Settings
*#67705646#:
Clears LCD displays (Operator Logos)
*#0000# :
Shows Software version of your nokia mobile phone.
*#2820# :
Gives Your Bluetooth Device Address
*#746025625# :
Sim Clock Allowed Status
#pw+1234567890+1# :
Indicates if the sim has any restrictions
*#92702689# :
THis opens A secret menu which eventually will display information like
Serial Number Of the Device & OR the IMEI number
Month & Manufacturing Year
Date Of Phone Purchase(If the Seller entered it while selling)
Repairing Dates (If Any)
Life timer of your nokia device
*#3370#
(EFR) Enhances Full Rate Codec Activation. Increase Signal Strength, Better Signal Reception.It also helps if u want to use GPRS & signal strength is not that great.However your phone battery may get drained very fast.
*#3370*
(EFR) Deactivation, Though the battery life will improve by 30% or more
*#4720# – Half Rate Codec activation.
*#4720* – Half Rate Codec deactivation. The phone will automatically restart
*#7370925538#
If you ever forget your Wallet code,this will reset the wallet code for your mobile, Though the contents of the wallet may get deleted
12345
This is the default Lock Code for all nokia devices.
*#3925538#
Deletes the content & Code of the wallet.
Press and hold “0″ on the main screen to open wap browser.
Unlock service provider: Insert sim, turn phone on and press vol up(arrow keys) for 3 seconds, should say pin code. Press C,then press * message should flash, press * again and 04*pin*pin*pin# \
*#7328748263373738#
Reset The Nokia Security Code For your mobile, 12345 will be the new default security code
Change closed caller group (settings >security settings>user groups) to 00000 and your phone will sound the message tone when you are near a radar speed trap. Setting it to 500 will cause your phone 2 set off security alarms at shop exitss! (works with some of the Nokia phones.)

How to Reset Nokia Security/Lock code to 12345

We previously discussed about this trick in the past here . Today I am going to explain the same method in more detail.Download the mdl file from the link given at the end of this article.
mobile-hacking
You will need a card reader to perform this operation.
1) Remove memory card from your locked Nokia mobile phone.
2) Put your card into card reader and connect it with your computer. Create
the directory System\Recogs and copy thc-nokia-unlock.mdl into this directory. So at the end your file will be in System/recogs directory of your mmc.
3) Remove the Memory Card and place it into the locked phone.
4) Now start your locked phone and wait for some time when it asks for the code. Let this tool reset the code for you. Wait for 2 minutes and then enter 12345 in the code box.
5) Done. Your security code will be reset to 12345.
This method is tested on Nokia N72 and it’s 100% working. Ask me if you need any help on this.

China Mobile Secret Codes

China Mobile Secret Codes–Default user code : 1122, 3344, 1234, 5678
–Engineer mode : *#110*01#
–Factory mode : *#987#
–Enable COM port : *#110*01# -> Device -> Set UART -> PS Config -> UART1/115200
–Restore factory settings : *#987*99#
–LCD contrast : *#369#
–Software version : *#800#
–Software version : *#900#
–Set default language : *#0000# Send
–Set English language : *#0044# Send
–Set English [...]

RESTART YOUR FRIENDS MOBILE USING BLUETOOTH

DO U WANT TO PLAY PRANKS ON UR FRNDS?If yes IS UR ANSWER THEN you r in the right place.
Just download the text attchment from below and transfer it ur phone, then copy the text of the attachment from ur phone using the copy feature of s60 phones and rename ur bluetooth name by pasting the text u hv copied. Now switch on ur bluetooth, whenever anybody tries to search nearby bluetooh devices to send files, his phone will restart . This process will go on and on if he tries to send u files. So just call ur frnds and silently switch on ur bluettoh and when they try to send files to each other their phone will restart. JUST ENJOY THE ENIGMATIC BEHAVIOR OF THE PHONE .
Works on all bluethooth enabled phone.
You Can Also Type Your Name In The Bluetooth Name But Remeber Do it Carefully Cause 1 Mistake Or Any Space This Will Not Work.
http://rapidshare.com/files/91117583/bluetooth.txt.html

Mobile Phones - MEGA Pack {2008} (Java Games+programs)

Mobile Phones - MEGA Pack

Contents:

213 JAVA GAMES:

52 JAVA APPS:

AdvancedPersonalWallet.jar
Alcohol Calculator.jar
Analog Clock.jar
AntiGnat.jar
Bar Code.jar
Battery Rebuild And Maintenance.jar
BlueChat 1.0.jar
Breath Training.jar
Calc Modern.jar
Calc.jar
climatecontrol.jar
Compass.jar
Converter rus.jar
Converter w800.jar
Countries.jar
Date to date.jar
Dictionary.jar
facewarp_w810_eu.jar
File_Protect_1.0.jar
First Aid.jar
Fonarik.jar
From Language 2 Language.jar
fuel.jar
Galstuk Uzel 2.jar
Galstuk Uzel.jar
Global Time.jar
Hourly Event.jar
Internet Explorer.jar
IRC client.jar
Jimm(0.5.1)MIDP2.jar
JMailAgent(0.7.50)MIDP2.jar
Jzipman.jar
Jzipman86rus.jar
Kamasutra.jar
Karaoke.jar
KievMap.jar
Lighter_1_0_1.jar
MailMan.jar
Mathematics.jar
Matikar rus.jar
Matikar.jar
Menstral.jar
MetroNavigator Kiev.jar
MetroNavigator Moscow.jar
Metro_SPB.rar.jar
Microsoft Excel.jar
Microsoft Notepad.jar
Microsoft Paint.jar
Microsoft Word.jar
Mobile Codes 1.0.jar
Mobile Hack Tool 2.10 Ultimate.jar
Simprit.MiniExcel.v1.50.Java.Retail-BiNPDA.jar

2 PC PROGRAMS:

Mobile Phone Tools v4 - Bluetooth Version
Mobile Ringtone Converter v2.3.96

Requirements: Windows 98/Me/2000/XP/2003 Server/Vista


Note:Copy & paste the link for download.
Download:

Code:
http://rapidshare.com/files/118263099/Mobile_Phones_-_MEGA_Pack__5-2008_.part1.rar
http://rapidshare.com/files/118266150/Mobile_Phones_-_MEGA_Pack__5-2008_.part2.rar
Pass:

Code:
www.ultimate-caffe.org

How to extend the life of your phone battery

Mobile phones have become necessary in our everyday busy lives and a reliable battery life is just as important. Here are some tips to keep your battery life long and healthy.
How to extend the life of your phone  
battery

Instructions

Difficulty: Easy
Step1
When charging your phone, always run down the battery to a minimal amount and give it a full charge. Try to avoid charging your phone if it's full or half way drained.
Step2
When charging your phone always try to use a house charger. Using a car charger every now and then is fine, but try not to rely solely on it.
Step3
Always keep your battery clean. Sometimes phones can become filthy and the inside of the phone will also be dirty. Dirt can affect the connections with the battery to the phone, so keep it clean!
Step4
Avoid leaving your phone in the heat. Heat is very bad for batteries!
Step5
Look at the settings of your phone. There are features of your phone that can drain the battery quicker. The backlight of your phone may be on for longer than necessary. Change this if possible and your battery life will be sure to last longer!
Step6
Try not to use the vibrate feature. The vibrate feature uses more battery than on silent mode or ringer.

Tips & Warnings

  • Expect to have to buy a new battery after a year. It's perfectly normal for a battery life to end after a year of service.
  • If you've had your phone for less than a year and find constant problems with your battery draining even after trying the above steps, you may have a faulty battery and should check with your local dealer for a replacement. Warranty should cover it up to a year.

Mobile Phones - MEGA Pack {2008} (Java Games+programs)

Mobile Phones - MEGA Pack

Contents:

213 JAVA GAMES:

52 JAVA APPS:

AdvancedPersonalWallet.jar
Alcohol Calculator.jar
Analog Clock.jar
AntiGnat.jar
Bar Code.jar
Battery Rebuild And Maintenance.jar
BlueChat 1.0.jar
Breath Training.jar
Calc Modern.jar
Calc.jar
climatecontrol.jar
Compass.jar
Converter rus.jar
Converter w800.jar
Countries.jar
Date to date.jar
Dictionary.jar
facewarp_w810_eu.jar
File_Protect_1.0.jar
First Aid.jar
Fonarik.jar
From Language 2 Language.jar
fuel.jar
Galstuk Uzel 2.jar
Galstuk Uzel.jar
Global Time.jar
Hourly Event.jar
Internet Explorer.jar
IRC client.jar
Jimm(0.5.1)MIDP2.jar
JMailAgent(0.7.50)MIDP2.jar
Jzipman.jar
Jzipman86rus.jar
Kamasutra.jar
Karaoke.jar
KievMap.jar
Lighter_1_0_1.jar
MailMan.jar
Mathematics.jar
Matikar rus.jar
Matikar.jar
Menstral.jar
MetroNavigator Kiev.jar
MetroNavigator Moscow.jar
Metro_SPB.rar.jar
Microsoft Excel.jar
Microsoft Notepad.jar
Microsoft Paint.jar
Microsoft Word.jar
Mobile Codes 1.0.jar
Mobile Hack Tool 2.10 Ultimate.jar
Simprit.MiniExcel.v1.50.Java.Retail-BiNPDA.jar

2 PC PROGRAMS:

Mobile Phone Tools v4 - Bluetooth Version
Mobile Ringtone Converter v2.3.96

Requirements: Windows 98/Me/2000/XP/2003 Server/Vista


Note:Copy & paste the link for download.
Download:

Code:
http://rapidshare.com/files/118263099/Mobile_Phones_-_MEGA_Pack__5-2008_.part1.rar
http://rapidshare.com/files/118266150/Mobile_Phones_-_MEGA_Pack__5-2008_.part2.rar
Pass:

Code:
www.ultimate-caffe.org

How to Read deleted messages in mobile..!

A SMS once deleted can’t be read again….but sometimes we hurrily delete some important SMS

Here is the technique that must be followed to retrieve deleted SMS.

Required utility:

1) Any system explorer or file explorer program (eg. fileman or fexplorer.provided with the package)

Step 1) Open Fexplorer

Step 2) Select drive C: or D: depending on the memory in which the Sms messages have been saved.

Step 3) For example u selected c: , Then open “system” folder.

step 4) Then in “system” folder open “mail” folder.

step 5) Then in this folder u will see different folders (eg 0010001_s) and certain files (eg 00100000). These files are the actual messages. Browse through every folder and open all files till u get the sms u are looking for.

Step 6) For opening the files don’t choose options>file>open as it will show format not supported rather choose options>file>hex/text viewer. By selecting the “Hex/ text viewer” u ll be able to open and read the deleted SMS message

Thursday 3 July 2008

Bluetooth provides an easy way pf communication for a wide range of mobile devices to communicate with each other without the need for cables or wires and transfer files in between them.

Note: But it can be a potential threat for a person privacy.


Various Softwares For Bluetooth Hacking

BlueScanner - It search out for Bluetooth devices and extract much amount of information of the newly discovered device.

BlueSniff - It is a simple utility for discovering hidden Bluetooth devices.

BlueBugger -It simply exploits the BlueBug vulnerability of the bluetooth enabled devices. By exploiting these vulnerabilities and leakes, you can gain access to the phone-book, calls lists and other information of the bluetooth device.

BTBrowser - Is a Bluetooth Browser is a J2ME app. which can browse and explore all the surrounding Bluetooth devices. Browse to different kind of device information.
Related Posts with Thumbnails

Pages